I've run into this problem with Zabbix before, but I just hit it again today and had to spend time figuring it out. Have you ever added a user to a group that is supposed to receive alerts when triggers go off on a host, but the user doesn't receive any e-mails? During troubleshooting, you'll probably notice that Zabbix doesn't even attempt to send e-mails.
In my case, this was because that particular user didn't have any rights to the host that had the triggers occur. So I simply added rights for the host to the user's group and things started working.
In short, your users must have at least read-only rights to any host that they should receive trigger e-mails from.
Thursday, September 17, 2009
Sunday, September 13, 2009
Conky
I recently discovered the coolness of a program called Conky. If you haven't heard of it, go to Conky's Sourceforge page. Essentially it is a system monitor that you can configure to show pretty much anything. The only thing I wish it could do at this point is cook me some eggs in the morning, but I digress.
If you just start up Conky after an install on Gentoo, it isn't much to look at. In fact, I had discounted this program before. This time around, it occurred to me that "Parted Magic", a Live CD distro for partition work, uses Conky and made it look pretty nice. I took the Conky configuration from Parted Magic and made my own changes. In the end, I have a nice monitor that let's me know pretty much everything I care to know about my machine at any given time.

You can find all of the available configuration options and variables in the documentation for Conky.
To make your life easier, here is my configuration.
# set to yes if you want Conky to be forked in the background
background yes

# X font when Xft is disabled, you can pick one with program xfontsel
#font 5x7
#font 6x10
font 7x13
#font 8x13
#font 9x15
#font *mintsmild.se*
#font -*-*-*-*-*-*-34-*-*-*-*-*-*-*

# Use Xft?
use_xft yes

# Xft font when Xft is enabled
xftfont Bitstream Vera Sans Mono:size=9

# Text alpha when using Xft
xftalpha 0.8

# Print everything to stdout?
# out_to_console no

# Print everything to console?
# out_to_console no

# Update interval in seconds
update_interval 2.5

# This is the number of times Conky will update before quitting.
# Set to zero to run forever.
total_run_times 0

#own_window_title Parted Magic - conky

# Create own window instead of using desktop (required in nautilus)
own_window yes

# If own_window is yes, you may use type normal, desktop or override
own_window_type normal

# Use pseudo transparency with own_window?
own_window_transparent yes

# If own_window_transparent is set to no, you can set the background colour here
own_window_colour black

# If own_window is yes, these window manager hints may be used
own_window_hints undecorated,below,sticky,skip_taskbar,skip_pager
#own_window_hints below,skip_taskbar,skip_pager

# Use double buffering (reduces flicker, may not work for everyone)
double_buffer yes

# Minimum size of text area
minimum_size 280 5

# Draw shades?
draw_shades yes

# Draw outlines?
draw_outline no

# Draw borders around text
draw_borders no

# Draw borders around graphs
draw_graph_borders yes

# Stippled borders?
stippled_borders 4

# border margins
border_margin 4

# border width
border_width 1

# Default colors and also border colors
default_color white
default_shade_color black
default_outline_color black

# Text alignment, other possible values are commented
#alignment top_left
alignment top_right
#alignment bottom_left
#alignment bottom_right
#alignment none

# Gap between borders of screen and text
# same thing as passing -x at command line
gap_x 15
gap_y 15

# Subtract file system buffers from used memory?
no_buffers yes

# set to yes if you want all text to be in uppercase
uppercase no

# number of cpu samples to average
# set to 1 to disable averaging
cpu_avg_samples 2

# number of net samples to average
# set to 1 to disable averaging
net_avg_samples 2

# Force UTF8? note that UTF8 support required XFT
override_utf8_locale no

# Add spaces to keep things from moving about?  This only affects certain objects.
use_spacer none

TEXT
${color goldenrod}Hostname: $nodename
${color goldenrod}Linux Kernel: $kernel
${color goldenrod}CPU Details:  $machine, $freq(MHz)
${color}CPU History:  ${color darkgreen}${cpugraph 30,0 0000ff 00ff00}
${color}CPU Usage:${color magenta2} $cpu% ${cpubar 11,0}

${color}RAM Usage:${color DeepSkyBlue1} $mem ($memperc%) ${membar 11,0}
${color}Available RAM:${color DeepSkyBlue1} $memmax

${color}Battery Status:${color DeepSkyBlue1} $battery
${color}Battery Time:${color DeepSkyBlue1} $battery_time

${color}Free Space on /:${color DeepSkyBlue1} ${fs_free /} (${fs_free_perc /}%)

${color}System Load Avg:${color DeepSkyBlue1} ${loadavg}
${color}Disk I/O:${color DeepSkyBlue1} ${diskio /dev/sda}
Touchpad, Hal, & X
When I first started setting up Gentoo on my laptop, my keyboard and mouse would freeze up whenever I started X (using Gnome or GDM). Unbeknownst to me, HAL actually does something for detecting hardware when X is started, and since HAL wasn't running my computer threw a fit. The simple fix was to make sure to start the HAL daemon on computer bootup.
The next issue I had was that my touchpad vertical and horizontal scrolling didn't work. I had already tried various things that I found online, but none of them made any difference. Using some other sites as reference, I put together my touchpad file for HAL that allows the scrolling to work. The file resides in "/etc/hal/fdi/policy". I called it "11-x11-synaptics.fdi". Here it is:
The next issue I had was that my touchpad vertical and horizontal scrolling didn't work. I had already tried various things that I found online, but none of them made any difference. Using some other sites as reference, I put together my touchpad file for HAL that allows the scrolling to work. The file resides in "/etc/hal/fdi/policy". I called it "11-x11-synaptics.fdi". Here it is:
<?xml version="1.0" encoding="ISO-8859-1"?>
<deviceinfo version="0.2">
  <device>
    <match key="info.capabilities" contains="input.touchpad">
     <merge key="input.x11_driver" type="string">synaptics</merge>
     <merge key="input.x11_options.SendCoreEvents" type="string">true</merge>
     <merge key="input.x11_options.VertEdgeScroll" type="string">true</merge>
     <merge key="input.x11_options.HorizEdgeScroll" type="string">true</merge>
     <merge key="input.x11_options.protocol" type="string">auto-dev</merge>
     <merge key="input.x11_options.shmconfig" type="string">true</merge>
     <merge key="input.x11_options.VertScrollDelta" type="string">20</merge>
     <merge key="input.x11_options.HorizScrollDelta" type="string">20</merge>
     <merge key="input.x11_options.LeftEdge" type="string">120</merge>
     <merge key="input.x11_options.RightEdge" type="string">830</merge>
     <merge key="input.x11_options.TopEdge" type="string">120</merge>
     <merge key="input.x11_options.BottomEdge" type="string">650</merge>
    </match>
  </device>
</deviceinfo>
Nvidia & Compiz (Redraw problems)
I just recently went through setting up Compiz on my laptop again. I had completely forgotten about the one issue that I had before and I had to search for it again. It seems that Compiz and Nvidia cards have a problem where windows will fail to redraw their contents. Needless to say, it get's frustrating when you can't be sure what text your cursor is really on.
In any case, it was a pretty simple fix. Load up the Compiz Settings Manager and go to the Utility->Workarounds. Simply enable the "Force ynchronization between X and GLX" checkbox and the problem will go away.
In any case, it was a pretty simple fix. Load up the Compiz Settings Manager and go to the Utility->Workarounds. Simply enable the "Force ynchronization between X and GLX" checkbox and the problem will go away.
Sunday, September 6, 2009
Openswan and Sonicwall
Versions:
I found a few tutorials on how to do this on google, but none seemed to work without changing things found in another tutorial. Here are a few for reference:
Needless to say, I had a lot of trial and error, but I got things working (in a way I think is better than the tutorials I found). I was able to rid my configuration files of hardcoded IP addresses for my laptop so that I can use this from anywhere. First off, let's start with the configuration needed on the Sonicwall Firewall itself.
Login to your Sonciwall and go to the "VPN" section. You'll see a screen similar to this:
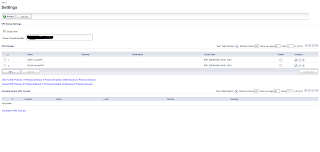 Take note of the "Unique Firewall Identifier" text box. You will need to know that value for later. Go ahead and click on the pencil icon next to "WAN GroupVPN" to edit it's settings. You'll end up with a window that looks like this:
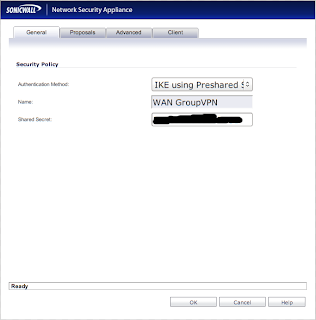
You need to be sure that "Authentication Method" is set to "IKE using Preshared Secret". Take note of the value that is in the "Shared Secret" text box. You'll need it later. Now click the "Proposals" tab to get a new window:
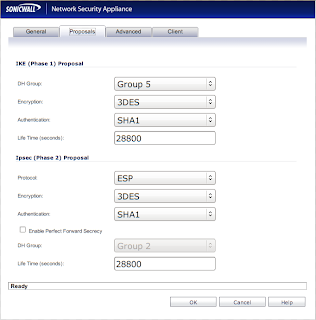 All your settings should reflect the screenshot, however, I'm pretty sure that "Life Time" can be whatever you want. Now click the "Advanced" tab to go to a new screen:
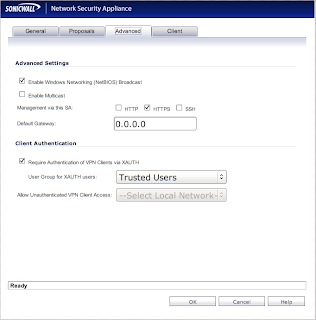
Check to be sure that the "Require Authentication of VPN Clients via XAUTH" box is checked. Also be sure that you have a valid user that belongs to whatever group you specify for "User Group for XAUTH users".
That takes care of the Sonicwall configuration, so now let's go back to your desktop/laptop machine.
Install a copy of Openswan to get the ball rolling. I use Gentoo, so the command for me is
The fun part really comes in setting up your configuration files, so be prepared to use your favorite text editor. Go ahead and edit "/etc/ipsec/ipsec.conf". The contents of the file should be like what I have below (using the comments as a guide). REMOVE THE COMMENTS IN YOUR OWN FILE!!!! If you leave them there, you WILL have problems.
Now that the main configuration file is finished, we need to create "/etc/ipsec/ipsec.secrets". That file is what stores the PSK (Pre Shared Key) that you saw earlier in the Sonicwall configuration. There will be line like:
@<leftid_from_ipsec.conf> @<rightid_from_ipsec.conf> : PSK "<my_psk>"
With those two files out of the way, you should be ready to connect now! First, be sure that the ipsec service is started by running "/etc/init.d/ipsec start".
Now you can start your VPN connection by running "ipsec auto --up MyVPN" where "MyVPN is the name of your connection in "/etc/ipsec/ipsec.conf".
Assuming that everything worked, you will be asked for your username and password after which the Sonicwall will connect you. To bring the connection down run "ipsec auto --down MyVPN".
If you ever want to change the connection configuration after the ipsec server is started, just run "ipsec auto --add MyVPN". That will reread the configuration file for changes to the "MyVPN" connection.
I hope that this saves you from hours of trial and error!
- Openswan 2.4.15
- Sonicwall Firmware 5.2.0.1-21o
- /etc/ipsec/ipsec.conf
- /etc/ipsec/ipsec.secrets
I found a few tutorials on how to do this on google, but none seemed to work without changing things found in another tutorial. Here are a few for reference:
Needless to say, I had a lot of trial and error, but I got things working (in a way I think is better than the tutorials I found). I was able to rid my configuration files of hardcoded IP addresses for my laptop so that I can use this from anywhere. First off, let's start with the configuration needed on the Sonicwall Firewall itself.
Login to your Sonciwall and go to the "VPN" section. You'll see a screen similar to this:
 Take note of the "Unique Firewall Identifier" text box. You will need to know that value for later. Go ahead and click on the pencil icon next to "WAN GroupVPN" to edit it's settings. You'll end up with a window that looks like this:
You need to be sure that "Authentication Method" is set to "IKE using Preshared Secret". Take note of the value that is in the "Shared Secret" text box. You'll need it later. Now click the "Proposals" tab to get a new window:
 All your settings should reflect the screenshot, however, I'm pretty sure that "Life Time" can be whatever you want. Now click the "Advanced" tab to go to a new screen:
Check to be sure that the "Require Authentication of VPN Clients via XAUTH" box is checked. Also be sure that you have a valid user that belongs to whatever group you specify for "User Group for XAUTH users".
That takes care of the Sonicwall configuration, so now let's go back to your desktop/laptop machine.
Install a copy of Openswan to get the ball rolling. I use Gentoo, so the command for me is
emerge openswan
The fun part really comes in setting up your configuration files, so be prepared to use your favorite text editor. Go ahead and edit "/etc/ipsec/ipsec.conf". The contents of the file should be like what I have below (using the comments as a guide). REMOVE THE COMMENTS IN YOUR OWN FILE!!!! If you leave them there, you WILL have problems.
#/etc/ipsec/ipsec.conf

config setup
     plutodebug="none"
     klipsdebug="none"
     nat_traversal=yes
     nhelpers=0
     interfaces = %defaultroute

conn MyVPN                           # Arbitrary connection name.
     type=tunnel
     left=%defaultroute              # The interface to use from the client.  %defaultroute
                                     # automatically selects an interface for you.

     leftid=@GroupVPN                # An arbitrary name to call your ID.  The "@" is required.

     leftxauthclient=yes             # Use XAUTH for connecting

     right=firewall.domain.com       # The FQDN/IP of the VPN server (Sonicwall)

     rightsubnet=192.168.168.0/24    # The subnet of the internal VPN interface on the Sonicwall
                              # (ie. The subnet you should be on after connecting)

     rightxauthserver=yes            # Use XAUTH for authentication

     rightid=@0078F89ABF             # The "Unique Firewall Identifier" from the Sonciwall
                              # (usually the serial number of the Sonicwall).  "@" is required.

     keyingtries=1
     auto=add
     auth=esp
     esp=3des-sha1
     ike=3des-sha1-modp1536
     xauth=yes
     pfs=no
     authby=secret
     aggrmode=yes

include /etc/ipsec/ipsec.d/examples/no_oe.conf
Now that the main configuration file is finished, we need to create "/etc/ipsec/ipsec.secrets". That file is what stores the PSK (Pre Shared Key) that you saw earlier in the Sonicwall configuration. There will be line like:
@<leftid_from_ipsec.conf> @<rightid_from_ipsec.conf> : PSK "<my_psk>"
#/etc/ipsec/ipsec.secrets

@GroupVPN @0078F89ABF : PSK "MySharedSecret"
With those two files out of the way, you should be ready to connect now! First, be sure that the ipsec service is started by running "/etc/init.d/ipsec start".
Now you can start your VPN connection by running "ipsec auto --up MyVPN" where "MyVPN is the name of your connection in "/etc/ipsec/ipsec.conf".
Assuming that everything worked, you will be asked for your username and password after which the Sonicwall will connect you. To bring the connection down run "ipsec auto --down MyVPN".
If you ever want to change the connection configuration after the ipsec server is started, just run "ipsec auto --add MyVPN". That will reread the configuration file for changes to the "MyVPN" connection.
I hope that this saves you from hours of trial and error!
Subscribe to:
Comments (Atom)