I've run into this problem with Zabbix before, but I just hit it again today and had to spend time figuring it out. Have you ever added a user to a group that is supposed to receive alerts when triggers go off on a host, but the user doesn't receive any e-mails? During troubleshooting, you'll probably notice that Zabbix doesn't even attempt to send e-mails.
In my case, this was because that particular user didn't have any rights to the host that had the triggers occur. So I simply added rights for the host to the user's group and things started working.
In short, your users must have at least read-only rights to any host that they should receive trigger e-mails from.
Thursday, September 17, 2009
Sunday, September 13, 2009
Conky
I recently discovered the coolness of a program called Conky. If you haven't heard of it, go to Conky's Sourceforge page. Essentially it is a system monitor that you can configure to show pretty much anything. The only thing I wish it could do at this point is cook me some eggs in the morning, but I digress.
If you just start up Conky after an install on Gentoo, it isn't much to look at. In fact, I had discounted this program before. This time around, it occurred to me that "Parted Magic", a Live CD distro for partition work, uses Conky and made it look pretty nice. I took the Conky configuration from Parted Magic and made my own changes. In the end, I have a nice monitor that let's me know pretty much everything I care to know about my machine at any given time.

You can find all of the available configuration options and variables in the documentation for Conky.
To make your life easier, here is my configuration.
# set to yes if you want Conky to be forked in the background
background yes

# X font when Xft is disabled, you can pick one with program xfontsel
#font 5x7
#font 6x10
font 7x13
#font 8x13
#font 9x15
#font *mintsmild.se*
#font -*-*-*-*-*-*-34-*-*-*-*-*-*-*

# Use Xft?
use_xft yes

# Xft font when Xft is enabled
xftfont Bitstream Vera Sans Mono:size=9

# Text alpha when using Xft
xftalpha 0.8

# Print everything to stdout?
# out_to_console no

# Print everything to console?
# out_to_console no

# Update interval in seconds
update_interval 2.5

# This is the number of times Conky will update before quitting.
# Set to zero to run forever.
total_run_times 0

#own_window_title Parted Magic - conky

# Create own window instead of using desktop (required in nautilus)
own_window yes

# If own_window is yes, you may use type normal, desktop or override
own_window_type normal

# Use pseudo transparency with own_window?
own_window_transparent yes

# If own_window_transparent is set to no, you can set the background colour here
own_window_colour black

# If own_window is yes, these window manager hints may be used
own_window_hints undecorated,below,sticky,skip_taskbar,skip_pager
#own_window_hints below,skip_taskbar,skip_pager

# Use double buffering (reduces flicker, may not work for everyone)
double_buffer yes

# Minimum size of text area
minimum_size 280 5

# Draw shades?
draw_shades yes

# Draw outlines?
draw_outline no

# Draw borders around text
draw_borders no

# Draw borders around graphs
draw_graph_borders yes

# Stippled borders?
stippled_borders 4

# border margins
border_margin 4

# border width
border_width 1

# Default colors and also border colors
default_color white
default_shade_color black
default_outline_color black

# Text alignment, other possible values are commented
#alignment top_left
alignment top_right
#alignment bottom_left
#alignment bottom_right
#alignment none

# Gap between borders of screen and text
# same thing as passing -x at command line
gap_x 15
gap_y 15

# Subtract file system buffers from used memory?
no_buffers yes

# set to yes if you want all text to be in uppercase
uppercase no

# number of cpu samples to average
# set to 1 to disable averaging
cpu_avg_samples 2

# number of net samples to average
# set to 1 to disable averaging
net_avg_samples 2

# Force UTF8? note that UTF8 support required XFT
override_utf8_locale no

# Add spaces to keep things from moving about?  This only affects certain objects.
use_spacer none

TEXT
${color goldenrod}Hostname: $nodename
${color goldenrod}Linux Kernel: $kernel
${color goldenrod}CPU Details:  $machine, $freq(MHz)
${color}CPU History:  ${color darkgreen}${cpugraph 30,0 0000ff 00ff00}
${color}CPU Usage:${color magenta2} $cpu% ${cpubar 11,0}

${color}RAM Usage:${color DeepSkyBlue1} $mem ($memperc%) ${membar 11,0}
${color}Available RAM:${color DeepSkyBlue1} $memmax

${color}Battery Status:${color DeepSkyBlue1} $battery
${color}Battery Time:${color DeepSkyBlue1} $battery_time

${color}Free Space on /:${color DeepSkyBlue1} ${fs_free /} (${fs_free_perc /}%)

${color}System Load Avg:${color DeepSkyBlue1} ${loadavg}
${color}Disk I/O:${color DeepSkyBlue1} ${diskio /dev/sda}
Touchpad, Hal, & X
When I first started setting up Gentoo on my laptop, my keyboard and mouse would freeze up whenever I started X (using Gnome or GDM). Unbeknownst to me, HAL actually does something for detecting hardware when X is started, and since HAL wasn't running my computer threw a fit. The simple fix was to make sure to start the HAL daemon on computer bootup.
The next issue I had was that my touchpad vertical and horizontal scrolling didn't work. I had already tried various things that I found online, but none of them made any difference. Using some other sites as reference, I put together my touchpad file for HAL that allows the scrolling to work. The file resides in "/etc/hal/fdi/policy". I called it "11-x11-synaptics.fdi". Here it is:
The next issue I had was that my touchpad vertical and horizontal scrolling didn't work. I had already tried various things that I found online, but none of them made any difference. Using some other sites as reference, I put together my touchpad file for HAL that allows the scrolling to work. The file resides in "/etc/hal/fdi/policy". I called it "11-x11-synaptics.fdi". Here it is:
<?xml version="1.0" encoding="ISO-8859-1"?>
<deviceinfo version="0.2">
  <device>
    <match key="info.capabilities" contains="input.touchpad">
     <merge key="input.x11_driver" type="string">synaptics</merge>
     <merge key="input.x11_options.SendCoreEvents" type="string">true</merge>
     <merge key="input.x11_options.VertEdgeScroll" type="string">true</merge>
     <merge key="input.x11_options.HorizEdgeScroll" type="string">true</merge>
     <merge key="input.x11_options.protocol" type="string">auto-dev</merge>
     <merge key="input.x11_options.shmconfig" type="string">true</merge>
     <merge key="input.x11_options.VertScrollDelta" type="string">20</merge>
     <merge key="input.x11_options.HorizScrollDelta" type="string">20</merge>
     <merge key="input.x11_options.LeftEdge" type="string">120</merge>
     <merge key="input.x11_options.RightEdge" type="string">830</merge>
     <merge key="input.x11_options.TopEdge" type="string">120</merge>
     <merge key="input.x11_options.BottomEdge" type="string">650</merge>
    </match>
  </device>
</deviceinfo>
Nvidia & Compiz (Redraw problems)
I just recently went through setting up Compiz on my laptop again. I had completely forgotten about the one issue that I had before and I had to search for it again. It seems that Compiz and Nvidia cards have a problem where windows will fail to redraw their contents. Needless to say, it get's frustrating when you can't be sure what text your cursor is really on.
In any case, it was a pretty simple fix. Load up the Compiz Settings Manager and go to the Utility->Workarounds. Simply enable the "Force ynchronization between X and GLX" checkbox and the problem will go away.
In any case, it was a pretty simple fix. Load up the Compiz Settings Manager and go to the Utility->Workarounds. Simply enable the "Force ynchronization between X and GLX" checkbox and the problem will go away.
Sunday, September 6, 2009
Openswan and Sonicwall
Versions:
I found a few tutorials on how to do this on google, but none seemed to work without changing things found in another tutorial. Here are a few for reference:
Needless to say, I had a lot of trial and error, but I got things working (in a way I think is better than the tutorials I found). I was able to rid my configuration files of hardcoded IP addresses for my laptop so that I can use this from anywhere. First off, let's start with the configuration needed on the Sonicwall Firewall itself.
Login to your Sonciwall and go to the "VPN" section. You'll see a screen similar to this:
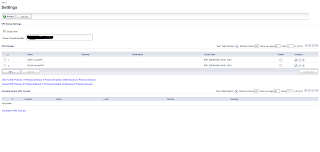 Take note of the "Unique Firewall Identifier" text box. You will need to know that value for later. Go ahead and click on the pencil icon next to "WAN GroupVPN" to edit it's settings. You'll end up with a window that looks like this:
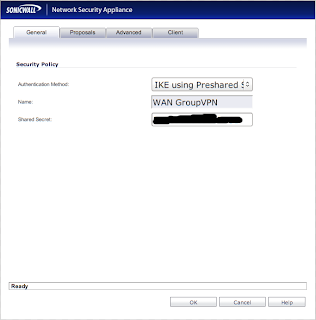
You need to be sure that "Authentication Method" is set to "IKE using Preshared Secret". Take note of the value that is in the "Shared Secret" text box. You'll need it later. Now click the "Proposals" tab to get a new window:
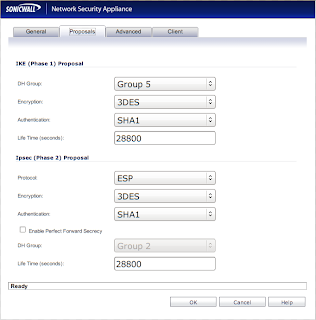 All your settings should reflect the screenshot, however, I'm pretty sure that "Life Time" can be whatever you want. Now click the "Advanced" tab to go to a new screen:
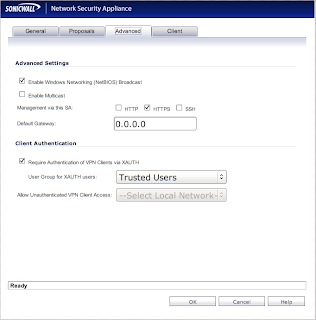
Check to be sure that the "Require Authentication of VPN Clients via XAUTH" box is checked. Also be sure that you have a valid user that belongs to whatever group you specify for "User Group for XAUTH users".
That takes care of the Sonicwall configuration, so now let's go back to your desktop/laptop machine.
Install a copy of Openswan to get the ball rolling. I use Gentoo, so the command for me is
The fun part really comes in setting up your configuration files, so be prepared to use your favorite text editor. Go ahead and edit "/etc/ipsec/ipsec.conf". The contents of the file should be like what I have below (using the comments as a guide). REMOVE THE COMMENTS IN YOUR OWN FILE!!!! If you leave them there, you WILL have problems.
Now that the main configuration file is finished, we need to create "/etc/ipsec/ipsec.secrets". That file is what stores the PSK (Pre Shared Key) that you saw earlier in the Sonicwall configuration. There will be line like:
@<leftid_from_ipsec.conf> @<rightid_from_ipsec.conf> : PSK "<my_psk>"
With those two files out of the way, you should be ready to connect now! First, be sure that the ipsec service is started by running "/etc/init.d/ipsec start".
Now you can start your VPN connection by running "ipsec auto --up MyVPN" where "MyVPN is the name of your connection in "/etc/ipsec/ipsec.conf".
Assuming that everything worked, you will be asked for your username and password after which the Sonicwall will connect you. To bring the connection down run "ipsec auto --down MyVPN".
If you ever want to change the connection configuration after the ipsec server is started, just run "ipsec auto --add MyVPN". That will reread the configuration file for changes to the "MyVPN" connection.
I hope that this saves you from hours of trial and error!
- Openswan 2.4.15
- Sonicwall Firmware 5.2.0.1-21o
- /etc/ipsec/ipsec.conf
- /etc/ipsec/ipsec.secrets
I found a few tutorials on how to do this on google, but none seemed to work without changing things found in another tutorial. Here are a few for reference:
Needless to say, I had a lot of trial and error, but I got things working (in a way I think is better than the tutorials I found). I was able to rid my configuration files of hardcoded IP addresses for my laptop so that I can use this from anywhere. First off, let's start with the configuration needed on the Sonicwall Firewall itself.
Login to your Sonciwall and go to the "VPN" section. You'll see a screen similar to this:
 Take note of the "Unique Firewall Identifier" text box. You will need to know that value for later. Go ahead and click on the pencil icon next to "WAN GroupVPN" to edit it's settings. You'll end up with a window that looks like this:
You need to be sure that "Authentication Method" is set to "IKE using Preshared Secret". Take note of the value that is in the "Shared Secret" text box. You'll need it later. Now click the "Proposals" tab to get a new window:
 All your settings should reflect the screenshot, however, I'm pretty sure that "Life Time" can be whatever you want. Now click the "Advanced" tab to go to a new screen:
Check to be sure that the "Require Authentication of VPN Clients via XAUTH" box is checked. Also be sure that you have a valid user that belongs to whatever group you specify for "User Group for XAUTH users".
That takes care of the Sonicwall configuration, so now let's go back to your desktop/laptop machine.
Install a copy of Openswan to get the ball rolling. I use Gentoo, so the command for me is
emerge openswan
The fun part really comes in setting up your configuration files, so be prepared to use your favorite text editor. Go ahead and edit "/etc/ipsec/ipsec.conf". The contents of the file should be like what I have below (using the comments as a guide). REMOVE THE COMMENTS IN YOUR OWN FILE!!!! If you leave them there, you WILL have problems.
#/etc/ipsec/ipsec.conf

config setup
     plutodebug="none"
     klipsdebug="none"
     nat_traversal=yes
     nhelpers=0
     interfaces = %defaultroute

conn MyVPN                           # Arbitrary connection name.
     type=tunnel
     left=%defaultroute              # The interface to use from the client.  %defaultroute
                                     # automatically selects an interface for you.

     leftid=@GroupVPN                # An arbitrary name to call your ID.  The "@" is required.

     leftxauthclient=yes             # Use XAUTH for connecting

     right=firewall.domain.com       # The FQDN/IP of the VPN server (Sonicwall)

     rightsubnet=192.168.168.0/24    # The subnet of the internal VPN interface on the Sonicwall
                              # (ie. The subnet you should be on after connecting)

     rightxauthserver=yes            # Use XAUTH for authentication

     rightid=@0078F89ABF             # The "Unique Firewall Identifier" from the Sonciwall
                              # (usually the serial number of the Sonicwall).  "@" is required.

     keyingtries=1
     auto=add
     auth=esp
     esp=3des-sha1
     ike=3des-sha1-modp1536
     xauth=yes
     pfs=no
     authby=secret
     aggrmode=yes

include /etc/ipsec/ipsec.d/examples/no_oe.conf
Now that the main configuration file is finished, we need to create "/etc/ipsec/ipsec.secrets". That file is what stores the PSK (Pre Shared Key) that you saw earlier in the Sonicwall configuration. There will be line like:
@<leftid_from_ipsec.conf> @<rightid_from_ipsec.conf> : PSK "<my_psk>"
#/etc/ipsec/ipsec.secrets

@GroupVPN @0078F89ABF : PSK "MySharedSecret"
With those two files out of the way, you should be ready to connect now! First, be sure that the ipsec service is started by running "/etc/init.d/ipsec start".
Now you can start your VPN connection by running "ipsec auto --up MyVPN" where "MyVPN is the name of your connection in "/etc/ipsec/ipsec.conf".
Assuming that everything worked, you will be asked for your username and password after which the Sonicwall will connect you. To bring the connection down run "ipsec auto --down MyVPN".
If you ever want to change the connection configuration after the ipsec server is started, just run "ipsec auto --add MyVPN". That will reread the configuration file for changes to the "MyVPN" connection.
I hope that this saves you from hours of trial and error!
Saturday, November 8, 2008
Proftpd & MySQL
Recently I re-worked the way that our FTP servers run at work. We use Proftpd in conjunction with MySQL for authentication. The setup required some reading from the Proftpd documentation, so I figured I could help someone out by showing our configuration found in the "proftpd.conf" file and what our database looks like.
First, the MySQL database has three tables: hosts, login_log, and users.
The "hosts" table is created with the intent that multiple hosts use this database for FTP authentication. Insert the FQDN of all hosts into the "name" field.
The "users" table holds all the pertinent user information. The "password" field is encrypted using the MySQL "PASSWORD" function. "ftpdir" holds the directory to chroot the user into. "uid" and "gid" are the respective user and group id to assign to files that are created on/uploaded to the server. "host_id" is used to specify which server this user can log in to. It ties back to the "hosts" table.
The "login_log" table is used for logging whenever a user logs into the server. "ip_address" stores the IP address of the person who logged in. "dns_name" is the contents of a reverse DNS lookup on the IP address. "username" is the name of the user that logged in.
Now for the actual "proftpd.conf" configuration.
This group of directives sets up some of the basics for the FTP server. Proftp suports Virtual Hosts in manner like Apache.
"DefaultServer" tells proftpd to use all the settings here as the default server when a connection comes in.
"ServerType" tells the Proftp daemon to listen for connections instead of using inetd.
"Port" sets the port to use.
"Umask" sets the default permissions.
"MaxInstances" sets the maximum simultaneous connections.
"User" and "Group" set the user and group to run the server as.
"SQLEngine" tells the server to turn on the abililty to use a SQL backend.
"SQLBackend" should be set to "mysql" to use MySQL as the authentication backend.
"SQLAuthTypes" tells the server what encryption is used for the password in the backend. The value "Backend" tells it to use the "PASSWORD" function for encryption.
"SQLConnectInfo" gives the connection info for the MySQL database.
"SQLAuthenticate" specifies the table to use for authentication.
"SQLNamedQuery" is used to specify a query to be used in some other location. For instance, this one is called "select_user". Looking at the "SQLUserInfo" line it can be seen that we use a custom query to authenticate users. The "select_user" query is used whenever a user attempts to log in. The columns MUST be returned in a very specific order. See the "SQLUserInfo" directive in the Proftp documentation for more information.
"SQLDefaultUID" and "SQLDefaultGID" are the user id and group id to use if none are specified. These values will probably never be used.
"SQLMinUserUID" and "SQLMinUserGID" are the minimum values allowed in the authentication table for a user. If these minimums aren't met the user will not be able to log in.
"SQLLog" tells Proftp a query to run when the given FTP command is given. In this case, it logs anything that successfully authenticates to the FTP server.
"SQLNamedQuery" again specifies a query to run when called. See "SQLNamedQuery" in the Proftp documentation for more details. To know what the different variables mean in the query, see "LogFormat" in the Proftp documentation.
"SystemLog" tells where to log all of the Proftpd messages.
"DefaultRoot" jails the user into their ftp directory when set to "~".
"AllowOverwrite" allows files to be overwritten.
"AllowRetrieveRestart" allows a file to restart a download from where it last finished.
"AllowStoreRestart" allows a file to restart an upload from where it last finished.
"UseReverseDNS" tells Proftp to do reverse DNS lookups.
"IdentLookups" tells Proftp whether or not to do Ident lookups.
"ListOptions" tells Proftp what options to pass to an "ls" command by default.
"TimeoutIdle" is the timeout before automatically disconnecting an idle user.
Quite a write-up, but I hope it helps someone.
First, the MySQL database has three tables: hosts, login_log, and users.
CREATE TABLE `users` (
     `id` int(11) NOT NULL auto_increment,
     `host_id` varchar(50) NOT NULL default '0',
     `username` varchar(100) NOT NULL default '',
     `passwd` varchar(100) NOT NULL COMMENT 'use PASSWORD() to encrypt',
     `uid` int(5) NOT NULL default '5000',
     `gid` int(5) NOT NULL default '5000',
     `ftpdir` varchar(255) NOT NULL default '',
     `ts_created` timestamp NOT NULL default '0000-00-00 00:00:00',
     `ts_modified` timestamp NOT NULL default CURRENT_TIMESTAMP,
     `deleted` smallint(1) NOT NULL default '0',
     PRIMARY KEY  (`id`),
     UNIQUE KEY `username` (`username`)
) DEFAULT CHARSET=utf8;

CREATE TABLE `hosts` (
     `id` int(11) NOT NULL auto_increment,
     `name` varchar(50) NOT NULL default '',
     PRIMARY KEY  (`id`),
     UNIQUE KEY `name` (`name`)
) DEFAULT CHARSET=utf8;

CREATE TABLE `login_log` (
     `ip_address` varchar(15) NOT NULL default '',
     `dns_name` varchar(150) default NULL,
     `timestamp` timestamp NOT NULL default CURRENT_TIMESTAMP,
     `username` varchar(100) NOT NULL default ''
) DEFAULT CHARSET=utf8;
The "hosts" table is created with the intent that multiple hosts use this database for FTP authentication. Insert the FQDN of all hosts into the "name" field.
The "users" table holds all the pertinent user information. The "password" field is encrypted using the MySQL "PASSWORD" function. "ftpdir" holds the directory to chroot the user into. "uid" and "gid" are the respective user and group id to assign to files that are created on/uploaded to the server. "host_id" is used to specify which server this user can log in to. It ties back to the "hosts" table.
The "login_log" table is used for logging whenever a user logs into the server. "ip_address" stores the IP address of the person who logged in. "dns_name" is the contents of a reverse DNS lookup on the IP address. "username" is the name of the user that logged in.
Now for the actual "proftpd.conf" configuration.
ServerName                    "FTP Server"
ServerType                     standalone
DefaultServer                  on
Port                           21
Umask                          007
MaxInstances                   30
User                           nobody
Group                          nogroup
This group of directives sets up some of the basics for the FTP server. Proftp suports Virtual Hosts in manner like Apache.
"DefaultServer" tells proftpd to use all the settings here as the default server when a connection comes in.
"ServerType" tells the Proftp daemon to listen for connections instead of using inetd.
"Port" sets the port to use.
"Umask" sets the default permissions.
"MaxInstances" sets the maximum simultaneous connections.
"User" and "Group" set the user and group to run the server as.
SQLEngine                        on
SQLBackend                       mysql
SQLAuthTypes                     Backend
SQLConnectInfo                   mysql_user@mysql_host db_name mypassword
SQLAuthenticate                  users
SQLUserInfo                      custom:/select_user
SQLNamedQuery                    select_user SELECT "username, passwd, uid, gid, ftpdir, '/bin/bash' FROM users WHERE deleted=0 AND username='%U' AND host_id=host_id_for_this_host"
"SQLEngine" tells the server to turn on the abililty to use a SQL backend.
"SQLBackend" should be set to "mysql" to use MySQL as the authentication backend.
"SQLAuthTypes" tells the server what encryption is used for the password in the backend. The value "Backend" tells it to use the "PASSWORD" function for encryption.
"SQLConnectInfo" gives the connection info for the MySQL database.
"SQLAuthenticate" specifies the table to use for authentication.
"SQLNamedQuery" is used to specify a query to be used in some other location. For instance, this one is called "select_user". Looking at the "SQLUserInfo" line it can be seen that we use a custom query to authenticate users. The "select_user" query is used whenever a user attempts to log in. The columns MUST be returned in a very specific order. See the "SQLUserInfo" directive in the Proftp documentation for more information.
SQLDefaultUID                   65534
SQLDefaultGID                   65534
SQLMinUserUID                   20
SQLMinUserGID                   20
SQLLog                          PASS insert_login
SQLNamedQuery                   insert_login INSERT "'%a', '%h', NOW(), '%U'" login_log
"SQLDefaultUID" and "SQLDefaultGID" are the user id and group id to use if none are specified. These values will probably never be used.
"SQLMinUserUID" and "SQLMinUserGID" are the minimum values allowed in the authentication table for a user. If these minimums aren't met the user will not be able to log in.
"SQLLog" tells Proftp a query to run when the given FTP command is given. In this case, it logs anything that successfully authenticates to the FTP server.
"SQLNamedQuery" again specifies a query to run when called. See "SQLNamedQuery" in the Proftp documentation for more details. To know what the different variables mean in the query, see "LogFormat" in the Proftp documentation.
SystemLog                         /var/log/proftpd/proftpd.log
DefaultRoot                       ~
AllowOverwrite                   on
AllowRetrieveRestart             on
AllowStoreRestart                on
UseReverseDNS                    on
IdentLookups                     off
ListOptions                      "-a"
TimeoutIdle                      3600
"SystemLog" tells where to log all of the Proftpd messages.
"DefaultRoot" jails the user into their ftp directory when set to "~".
"AllowOverwrite" allows files to be overwritten.
"AllowRetrieveRestart" allows a file to restart a download from where it last finished.
"AllowStoreRestart" allows a file to restart an upload from where it last finished.
"UseReverseDNS" tells Proftp to do reverse DNS lookups.
"IdentLookups" tells Proftp whether or not to do Ident lookups.
"ListOptions" tells Proftp what options to pass to an "ls" command by default.
"TimeoutIdle" is the timeout before automatically disconnecting an idle user.
Quite a write-up, but I hope it helps someone.
Sunday, October 26, 2008
SVN & MySQL
Just a week ago, my company migrated to SVN from CVS. I won't go into a discussion of why or what the differences are, but I thought it would be worth writing about our configuration of SVN. Before getting started, I should point you to the free, excellent SVN book found at http://svnbook.red-bean.com/. If you wanted to know about any of the features or configuration options available in Subversion, that's a great place to look.
There were three things that I wanted to accomplish with SVN:
1. Authentication using a MySQL database
2. The ability to manipulate access control at any level in the repository using the MySQL authentication (ie. Only allow access for a user to /client/trunk/project, not to the whole trunk)
3. The connection had to be HTTPS. I don't want our source code going over the internet in plain text.
First, let's cover the basics. Since I'm coming at this from the point of view of a Gentoo installation, I'll cover what's needed for that. The "dev-libs/apr-util" package must be compiled with the "mysql" USE flag enabled. As for apache, I just compile it with all modules enabled. This is easy to accomplish by setting APACHE2_MODULES="*" in /etc/make.conf. As for the MPM to use for Apache, we've been using the "prefork" one. I can't really give an argument for any given MPM since I don't know enough about performance of them to argue a point.
The second step is fairly obvious. You have to compile Apache. It should drag in the apr-util package as a dependency, but if it doesn't for some reason, make sure you compile that package as well. A simple "emerge apache" will do the trick.
The third and final step is to set up the configuration. I'll step through the configuration for our server to give a flavor of what it could look like. You can throw this stuff into a Virtual Host if that is what you want. It's what I did.
That's about it! Not the neatest write-up, but I hope this helps someone. I know I had a heck of a time trying to get it all working correctly. You can add as many locations as you want for different clients and/or subdirectories.
Edit: Something I found out later is that apr-util v1.3.x compiled with MySQL support and PHP compiled with MySQL support don't mix. It will cause Apache to segfault and puke all over the place. Use apr-util v1.2.x to avoid this problem (see https://bugs.gentoo.org/show_bug.cgi?id=240264 for details on the issue).
There were three things that I wanted to accomplish with SVN:
1. Authentication using a MySQL database
2. The ability to manipulate access control at any level in the repository using the MySQL authentication (ie. Only allow access for a user to /client/trunk/project, not to the whole trunk)
3. The connection had to be HTTPS. I don't want our source code going over the internet in plain text.
First, let's cover the basics. Since I'm coming at this from the point of view of a Gentoo installation, I'll cover what's needed for that. The "dev-libs/apr-util" package must be compiled with the "mysql" USE flag enabled. As for apache, I just compile it with all modules enabled. This is easy to accomplish by setting APACHE2_MODULES="*" in /etc/make.conf. As for the MPM to use for Apache, we've been using the "prefork" one. I can't really give an argument for any given MPM since I don't know enough about performance of them to argue a point.
The second step is fairly obvious. You have to compile Apache. It should drag in the apr-util package as a dependency, but if it doesn't for some reason, make sure you compile that package as well. A simple "emerge apache" will do the trick.
The third and final step is to set up the configuration. I'll step through the configuration for our server to give a flavor of what it could look like. You can throw this stuff into a Virtual Host if that is what you want. It's what I did.
#I realize that the document root points to somewhere other than the SVN repositories.  This is intentional.  It's the only way I could get Subversion to work the way I wanted it to.
DocumentRoot /var/www/localhost/htdocs/

#Enable SSL.  It's as simple as turning the engine on and providing the paths to the cert and the key
SSLEngine On
SSLCertificateFile /etc/apache2/ssl/domain.crt
SSLCertificateKeyFile /etc/apache2/ssl/domain.key

#This is the real meat and potatoes of the whole thing.

#This enables the mod_dbd MySQL driver
DBDriver mysql

#This causes mod_dbd to maintain the MySQL connection after every query instead of reconnecting for every MySQL call.
DBDPersist On

#These are the basics for a MySQL connection.  Notice that the whole line is surrounded in quotes.   See http://httpd.apache.org/docs/2.2/mod/mod_dbd.html for other parameters that can go on this line.
DBDParams "host=mydatabase.server.com user=myuser pass=mypassword dbname=mydatabasename"


# The location "/" causes SVN to interpret anything that follows the "/" as a repository path
<location />
     DAV svn  #Treat the location as a subversion repository
     SVNParentPath /var/svn/  #This treats any directory under "/var/svn/" as the root of  a repository
     Allow from all  #Allow access from anywhere
     AuthName "Login"  #The title of the authentication window
     AuthType Basic  #Not quite sure what this does, but it's necessary
     AuthBasicAuthoritative Off  #Tells Apache to try other authentication methods if this one doesn't work
     AuthBasicProvider dbd #Tells Apache to try mod_dbd authentication first
</location>

#A regex that is used to determine the query to use for my current location
<locationmatch ^/client/trunk|tags|branches/project>
     # This location requires an authenticated user.  AuthDBDUserPWQuery determines how apache decides if the user is valid.  The password in MySQL must be stored using the ENCRYPT() function.  The supplied password must mach the stored ENCRYPT() password.

     Require valid-user
     AuthDBDUserPWQuery "SELECT password FROM users WHERE user=%s"
</locationmatch>
That's about it! Not the neatest write-up, but I hope this helps someone. I know I had a heck of a time trying to get it all working correctly. You can add as many locations as you want for different clients and/or subdirectories.
Edit: Something I found out later is that apr-util v1.3.x compiled with MySQL support and PHP compiled with MySQL support don't mix. It will cause Apache to segfault and puke all over the place. Use apr-util v1.2.x to avoid this problem (see https://bugs.gentoo.org/show_bug.cgi?id=240264 for details on the issue).
Subscribe to:
Posts (Atom)